Showing posts with label tutorial. Show all posts

Sunday, January 25, 2015

The Slip Stitch


Now that we have a basic knowledge of what crochet is, and now that we know how to read those pesky labels, let's start crocheting!

For this first exercise, you will need a standard size H/8-5.00mm crochet hook.


You will also need medium weight acrylic yarn. I do not recommend using expensive yarn, for people who are just beginning. Get the cheap stuff and figure out how to make this work for you before you go buy expensive yarn. You will be less worried about mistakes using cheap, general, run of the mill, acrylic than you would be on yarns that are softer, fuzzier, finer, and over all more difficult to work with. You want yarn that is simple to pull knots out of and won't make you feel guilty if you end up cutting knots out.


The Chain Stitch:

Before we can make those classic afghans, or the cute little baby hats, or intricate lace, we need to start with the simplest, and most widely used stitch in all of crochet. This is generally the foundation for almost ALL projects. There are one or two other methods for starting projects, but those are slightly more complicated and not as important to learn for beginners. Now I say this stitch is simple because it is only intimidating before you get the hang of it. It's not complex in the way of other stitches, but it can be tricky to those who cannot see the way the yarn interlocks. If you struggle with this stitch, the only way to improve is to practice, stare at it, practice, stare at it some more, and practice until you can make a large chain by feel, with you eyes closed.

The first step is to set up your yarn. start with a slip knot. 


The next step is to set up your hands. put the slip knot on the crochet hook and pull tight. Hold the crochet hook like a pencil with the hook facing the ground


To start the chain stitch, wrap the yarn over the top of the hook (as shown above) and pull the wrap through the slip knot.


Repeat this until you have the desired number of chains for your project. This is a great exercise for beginners to practice. it gives you a good feel for the rest of the craft.


If you have never crocheted before, I hope this helps!
 Remember Practice doesn't make perfect, perfect practice makes improvement:)

Tuesday, January 20, 2015

How to Read Yarn Labels


Before you begin in your crocheting, knitting, or general yarn usage endeavors, it is helpful to understand how to read the symbols on yarn packaging.

Many people just find yarn they like and go for it. To their dismay, their projects end up ripped out, too small, knotted up, too large, disproportionate, they shrink in the wash, or they felt up and they hours of intricate detail work becomes matted and fuzzy.

Generally, crafters know that a big thick fuzzy yarn isn't going to be used in a tiny, intricately delicate doily, conversely, a thin light fingerling yarn wouldn't be used to make a big, bulky, fluffy stuffed animal.

However, there is a gray area in between the two extremes. Yarn companies understand that every skein is different and that the same general type of yarn has certain qualities which make it favorable for different projects and unsuitable for others.

Below are some links to help you understand the different symbols on the bands.


I hope these links give you a better understanding of how to read your yarn label before we begin our projects together:)

God Bless you!

"She seeketh wool, and flax, and worketh willingly with her hands."
  ~*~* Proverbs 31:13*~*~

Wednesday, October 8, 2014

Chocolate Cupcake Gems

So on this blog, I try to share recipes made from scratch or close to scratch. However, box mix cakes are super easy and quick to use or doctor. With a little creativity, you can make a fabulous treat that doesn't taste like something out of a box.

One such recipe has quickly become a favorite.

Chocolate Cupcake Gems

From the Kitchen of Keira Leinbach

1 box Devil's Food Cake mix
1 box Yellow Butter Cake mix

Preheat oven to 350

Pour half of the contents of each cake mix into a large mixing bowl.
Follow the instructions on the back of the Butter cake mix  box (egg amount, butter instead of oil, etc.). Thoroughly mix the batter. Using a mini greased muffin tin, spoon a little bit of batter (size of a quarter) then place a Hershey Kiss in each cup. Fill the cup to desired height (generally 2/3 full, we like our cupcakes a little bigger).

Bake for about 10 min and check to see is fully cooked by using a toothpick. remember that there is chocolate in the middle so only check the top part or side of one cupcake.

Once they are fully baked, let them cool and frost them.

We used the prepackaged chocolate fudge frosting, but there are so many yummy and simple frostings out there to make, experimenting could be fun.

I hope you enjoy this quick and easy cupcake recipe!!!


God Bless!


Monday, September 29, 2014

Mini Peach Muffins

This morning after feeding the horses, I decided to make muffins. When I cracked open the egg, it had a double yoke! Yesterday, I finally went through the stock I had of store-bought eggs, from when our new laying hens were maturing. So today, the first egg (from our new layers) that I cracked open was this little beauty. I was already so excited to finally be able to use the ones from our layers, and low and behold a double yoke!

Anyways enough about the exciting egg. I'm sure you would all rather have the recipe for the bites size treats mentioned in the title!

Warning: they are slightly addicting so be sure to keep them out of arms reach once they are cooled.

 Mini Peach Muffins

For this recipe I had a general guide, but I'm one of those "well that looks like the right amount" sort of cooks/ bakers so again, I apologize for the rough estimate.

1 3/4 c flour
1/3 c sugar
2 1/2tsp baking powder
dash of salt (or so)

1 egg
2/3c melted butter
milk

3 canned peach halves broken up into incredibly tiny pieces (I personally like home canned because they are softer and sweeter than fresh or store bought but the others work just as well) 

Combine and mix dry ingredients in a mixing bowl.
Add the egg, butter, and enough milk to make a thick batter. I guesstimated about 1c probably. It mostly depends on the humidity. Finally gently stir in your peaches. Be sure that everything is coated while mixing the least amount possible. Your batter should be thin enough to spoon into the muffin pan, but should not be smooth like a cake batter (Remember that the more you stir muffin batter, the more dense they will be once they are cooked).

Spoon the batter into your lightly greased muffin tin.

I used mini muffin tins. So they were only in the oven for about 10 minutes (or so) at 400 F.

For regular sized muffins, I'd time for about 20 minutes, then check to see the progress.

These are light colored treats, so the edges will be browner than the tops. Don't fret when they aren't the perfect golden brown that is encouraged on the back of a box mix- they will still taste great!

I hope you enjoy this recipe!


Friday, September 26, 2014

Spinach Smoothies


One of the staple foods my family is spinach- we eat it fresh from the garden, cooked on the side, in casseroles, with tortellini, cooked into Fettuccine Alfredo,  cooked with chicken. It is one of the most delicious greens. It is also a great source of vitamins and minerals.
As odd as it sounds, spinach is one of my favorite ingredients in smoothies. I was introduced to this idea a couple of years ago and have since made some alterations to the recipe I was given to fit what foods I usually have in the kitchen. I've made these yummy smoothies before, but never for my family. So when we were working on school, I pulled out the blender and started adding ingredients. My little sisters were a bit reactionary to the ordeal. The older one was confused as to why I would put a leafy green into a drink, but the younger one was eager to try the green concoction. When all of their favorite things were put in the mix, they started getting excited. After they tried it, I was enthusiastically informed that Younger Sister had never had a better smoothie in her life- shakes are still her favorite, but if she ever wanted a smoothie, this is the one she wants. So with the seal of approval, from two little girls, below is my guesstimated recipe for Spinach Smoothies.

To make a single blender-full of this yummy treat:

2c ice
2c orange juice
1 banana
6oz vanilla yogurt
a couple handfuls of spinach leaves

**these are guesstimate amounts so alter it to fit your tastes or the room in your blender**

Put all ingredients in the blender with the ice on the bottom. Put the lid on and puree until smooth.
It is best if served fresh, but if you want to save some for later, put it in the refrigerator to chill.


I hope you enjoy!


Thursday, September 25, 2014

The Lost Art of Traditional Table Etiquette in the Home


The Art of Table Etiquette has been something that isn't necessarily lost. Restaurants, hotels, formal occasions, etc have kept the art of setting a table alive and well. However, in the everyday, etiquette seems to be something of a time forgotten. Children were once responsible for setting the places at the table almost every day- now if you ask most children, they don't know how. similarly, many of the niceties, that were once a display of courtesy and respect, have been replaced with brash and unrefined behavior in everyday living. Maybe if we start with learning and practicing good table manners, we might start to see a difference in the rest of our manners.

A great resource for etiquette and manners is linked below:


The top ten table manners listed on the website is shown below:

1. Chew with your mouth closed.
2. Avoid slurping, smacking, and blowing your nose.
3. Don’t use your utensils like a shovel or as if you’ve just stabbed the food you’re about to eat.
4. Don’t pick your teeth at the table.
5. Remember to use your napkin at all times.
6. Wait until you’re done chewing to sip or swallow a drink. (The exception is if you’re choking.)
7. Cut only one piece of food at a time.
8. Avoid slouching and don’t place your elbows on the table while eating (though it is okay to prop your elbows on the table while conversing between courses.)
9. Instead of reaching across the table for something, ask for it to be passed to you.
10. Always say ‘excuse me’ whenever you leave the table.


Table Setting:

One of the key points in table etiquette is behavior. But it is also important that the table is set appropriate to the occasion. 

Below is a link to the three levels of table setting- basic, informal, and formal:

The pictures below are from the website linked above. For more information on each setting, click the link!

Everyday Setting:
basictablesettingimage


Semi-Formal/ Informal Setting:
informaltablesettingimage


Formal Setting:
formaltablesettingimage 


I hope that this provides some insight into dining etiquette! Remember that it is important for us to always try to be our best selves. Yes, it is exhausting at times, but it is always worth it to error on the side of gentility rather than unintentionally offend. Just as with the other topics in the "Lost Arts" series, let's bring back table manners into a more common place in society! Who knows what a little politeness might do for the world? Pleasant manners, lively conversation, and a sweet spirit have done many a heart good. Sometimes it is the simple gestures that can change a mood. Let us remember that and keep it with us as we go through out our everyday tasks.


Friday, May 30, 2014

Contact Paper

Recently I got my own kitchen. 
However, It needs a little TLC before I will feel comfortable stocking it 
and cooking more than simple microwave meals. 

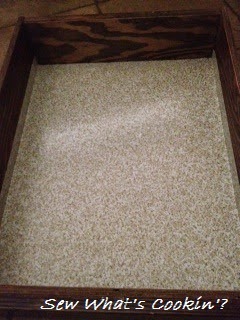
One of the first projects that needed to happen was putting contact paper down in the cupboards. 
The reason I chose contact paper is because it is easy to put down and it provides an easier surface to clean than the exposed surfaces of the wood. It also looks nicer than the plain dingy brown.

 
The first step is to remove the drawers you want to work on

 
Next clear them out and make sure there are no large pieces of debris, rocks, or food

Above show the materials I used to clean the draws. I found bleach works well to get them clean, then after they are dry pine sol is good to condition the surface.

Wipe down the surface and be sure to not leave any grime. 
Thoroughly  clean it and let it dry completely.

The next step is to measure out the contact paper. Every surface is different, so I suggest making the length about an inch longer than you need as it shrinks once it is applied, and it can always be cut.

Peal back the corner of the backing on the contact paper and slowly, carefully remove it.

Center the paper and lay it completely flat on the surface. Make sure to press it down from the center to the edges, to ensure that there are no air bubbles between the paper and the surface. Air bubbles or left over grime will cause it to peal so it is important that the surface is clean and the paper is secure.
To clean, you can use kitchen wipes, surface cleaner, and it is for the most part water tolerant. 

I hope that this short tutorial will help inspire you if you need ideas for improving a kitchen that you can't afford to renovate. The key to a smoothly running kitchen is clean and organized , not expensive or overly messy. Make sure items you use consistently are located in a practical location and always put away, washed, and in the same place after every use. Remember it's always easier to do a little work everyday than a lot of work in one sitting. A clean kitchen will also keep everyone in better spirits. The kitchen is the heart of the home, and a healthy heart is a happy heart!


May you see God's blessings today!


Tuesday, April 22, 2014

Fun With Crayons

A couple of months ago, for a home school lesson my mom was doing with my younger siblings, we made new crayons out of old broken crayons.
If you are anything like my family, after a couple of coloring pages, there always seems to be a broken crayon or two. I thought it would be a tutorial, on how to reuse the broken crayons. This is one way to save a bit of money and can reuse the materials that you've already purchased.

Step 1: 
Gather all the broken pieces in the bottom of the crayon bucket.
 Strip them of their wrapping and sort them by color.

 Step 2: 
Preheat the oven to about 200F.
Line a muffin tin (any size we used a standard) with tinfoil. 
Leave enough foil to cover the edges so that the wax doesn't stick to the pan after you are done, 
and so that you can remove the new crayons once they are cool.
Place the broken crayons in the foil lining.


Step 3:
Place the tin in the oven and keep a close eye on it. 
The timing isn't always exact. 
Sometimes it can take five minutes sometimes ten, sometimes more.
You just want the wax to be completely melted. 
Don't let it boil because that will bring about air bubbles.


Step 4:
Once the wax is melted, let it to cool.
Don't touch the new crayons until it is completely set.
After the wax is solid again, remove the tinfoil.
These new crayons can be used as soon as they are solid. 


 I hope you found this helpful. It is truly a fun project to do with little kids.

*~*~*~*~*~*~*~*~*~*~*~*~*~*~*~*~*~*~*~*~*~*~*~*~*~*~*~*~*~*~*~*~*~*~*~*~*~*~*~*

Monday, July 8, 2013

"Every Heart Beats True 'Neath the Red, White, and Blue" -berry Cobbler that is...

What says "Americana-Summer" more than a blueberry cobbler? It is yummy fresh out of the oven, or room temperature the day after. A cobbler consists of a thick crust and fruit filling. This specific recipe does not use the traditional biscuit-like crust. It does however, layer the fruit between a flour based, butter crust which still allows it to be considered a cobbler.  During the time of its invention, the Pilgrims that came to America would  alter the traditional family recipes to fit their new environment. If ingredients in the recipes weren't available, they would improvise. This led to the diversity of the many different recipes.  Similarly, the lack of consistent ingredient availability made way for other delicious culinary creations. A single recipe could have been used for cobblers, crumbles, pan-dowdies, crisps, Betties, buckles, crumbles, grunts, slumps, sonkers, and many other cobbler-like dishes.

I hope that you enjoy this recipe!


Blueberry Cobbler- Leinbach Family Recipe
Crust:                                                 Filling:
1 c. Hazelnuts                                     ½ c. granulated sugar
2 c. All- purpose flour                         1 ½ TB cornstarch
½ c. granulated sugar                          1quart of canned Blueberries
¾ c. chilled butter cut into pieces
Preheat oven to 450F. In a food processor, process nuts until finely ground. In a large bowl, mix nuts, flour, sugar, and cut in butter until the mixture crumbles. In a separate bowl, mix the berries, sugar and cornstarch until the berries are evenly coated. Press half of the mixture into the bottom of the pan. Evenly spread the filling over the crust and sprinkle the second layer of crust over the top. Bake until the top is golden (Approx 30min).

Let cool and serve warm.

Friday, April 5, 2013

Pineapple Upside Down Cake

This yummy traditional favorite is easy to make and even easier to eat!

Ingredients:

1/2c butter
1 1/3c packed brown sugar
32oz sliced (or chunked pineapple)-drained
1c Maraschino Cherries- drained

1French Vanilla box mix

Preheat oven to 350F

Melt butter in a 9x13 pan in the oven. After it is melted, sprinkle all of the brown sugar over the bottom of the pan. Arrange pineapple slices flat on the bottom and put one cherry in the center of each slice. Make the cake batter according to the packaged instructions and pour over pineapples.

Bake for 35 min or until the cake is fully cooked and golden brown.

Serve warm.

(If you prepare it the day before you serve it, cover the pan and put it in the fridge. It will have a richer flavor when reheated the next day.)


From the Kitchen of Linda Inman

Saturday, December 22, 2012

Embroidered Snowflakes


Materials:
  • fabric
  • small embroidery hoop (I have sewn with and without hoops, with and with out interfacing. I have found that when starting out it is best to work on a light weight, not thin, material and hoops)
  • embroidery needle(again the needle you pick is a personal preference. tapestry needles have larger eyes, but the shank of the needle is thicker, milliner needles are uniform in thickness but it can be difficult to find ones with larger eyes)
  • skein of white embroidery floss
  • silver embroidery floss
  • beads
  • pull thread from the back and insert about an inch away
  • insert the thread again from the back and repeat as before first in thirds
  • repeat with the three new stitches in between the others. Now you have a total of six stitches
  • create a fly stitch between each of the inch "spokes" (bring needle through the top of one of the spokes. insert at the top of the adjacent spoke. take a "bite" of the fabric half-way between the two spokes and slightly lower than the top of the stitches. pull tight, and fasten the thread to the fabric.)
  • repeat this five times
  •  at each vertex create a detached chain stitch. (bring needle from back. insert again in the same hole but don't pull all the way back through. you should have about a 1/2 inch loop. come from the back and secure the loop with a small stitch.)
  •  at the top of the longer chain stitches, sew another chain stitch, but this time, split and secure the sides to create a diamond. above the smaller chain stitches, sew a fly stitch.
  •  Above is what the finished white snow flake will look like.

  • to embellish, sew two fly stitches over the long chain stitches and one fly stitch over the shorter ones. do this in a contrasting color- the above is in silver.
  • for fun, plastic imitation pearl beads were used to hide the center.
  • get creative and add your own embellishments!
Although this may seem complicated at first, once you understand the basic stitches, the snowflake becomes one of the quickest and prettiest embellishments for winter themed projects.
I hope that you have fun sewing snowflakes!

 The above is a similar concept using only fly stitches. The silver embellishment is wrapped around the "spokes"
 This snowflake is a little bit more complicated. The scroll stitch was used for the smaller spokes and the v-shape on the taller spokes. The taller spokes are created with the detached chain stitch. The silver embellishments include the fly stitch on the taller spokes, and the detached chain stitch with the two extra darts (shown in the tutorial) as the border of the scroll stitches. Wouldn't it be pretty with beads in the center to cover up the nasty middle?
This one is very simple. It involves detached chain stitches for the spokes and a french knot in the center.

***If my instructions for the detached chain stitch or the fly stitch were confusing, there are many wonderful videos on YouTube which are very clear and simple to follow.***

Friday, December 14, 2012

Christmas Kringle

The other day one of our wonderful friends stopped by for a visit. She brought us the most delicious Kringle. She was given the recipe many years ago by a German family who brought it to America when they immigrated, and it has become an iconic Christmas pastry to all those who know our friend. I hope that you enjoy today's yummy treat!
 
 
Christmas KRINGLE

Bottom Layer:
1 cup flour
½ cup butter or margarine
2 Tbs ice water (may need a small amount more)
 
Cut butter or margarine into flour (same as pie crust) until pea sized. 
Add ice water and form into two balls.  May need to add a bit more water.
Pat out each portion on a baked cookie sheet 3” wide by 12” long.

Top:
1   cup water
½  cup margarine or butter

Bring to boil in medium saucepan.  Remove from heat

Add
1 cup flour, stir until smooth
3  eggs, Stir in one at a time, with heavy spoon or rubber scraper until smooth and mixture is consistent throughout.

Add
½  tsp Almond extract, mix well
Divide mixture in half and spread over bottom layer.

Bake at 400 degrees for 30 minutes

Frosting can either be put on while still warm as a glaze or wait until pastry is cool and frost.

Frosting:

1 cup powdered sugar                                         
½  tsp almond extract
2 Tbs. butter or margarine
    Small amount of Milk to thin for spreadable consistency

Optional:
Sprinkle sliced almonds over frosting, and decorate with colored sugar

Cut each pastry in half lengthwise, then in 1 – 2 inch diagonal strips width wise.

From the Kitchen of Brenda Werrett


Monday, November 26, 2012

Stuffing or Dressing?

Is if Stuffing or Dressing?
There is much confusion about this breaded side dish that is a staple of holiday menus.
If they both have the same ingredients, then what's diffference?
The difference in the name is only a matter of where is cooked.
Put simply, stuffing goes in the bird, dressing goes beside it.
The recipe being shared today is an easy and delicious comfort food.
(we are going to cook it dressing style)

 Ingredients:

16oz Bread Crumbs
1c celery        1c onion
1c pecan        1c apple
1c mushroom 1c carrot
 
8TB butter          2 1/2c broth
1 1/2 TB sage  1/2 tsp marjoram
1tsp thyme        3TB parsley
1tsp basil
salt and pepper
 
*the recipe calls for 1c of each veggie/ fruit...
we did a bit more than that to feed a family of six, plus leftovers...
 

in a large pot, over medium heat, start melting the butter. Add the celery, carrots, apples, mushrooms, spices and broth. stir until butter is melted and everything is well mixed. Add the bread crumbs and pecans and mix until the bread crumbs are well saturated and all is evenly incorporated.

disperse the dressing in a glass baking pan and bake at 350F until the top has a golden crust
(around 45min- 1hr)
 serve hot
 
From the kitchen of: Kimberly Leinbach